Semantic Tool Selection in Practice: A Step-by-Step Guide with MCP Connect Inspector UI
Set up semantic tool selection from scratch using MCP Connect Inspector UI, Neo4j, and vector search. Reduce token usage by 89% and response times by 62% while maintaining 100% accuracy.

Set up semantic tool selection from scratch and reduce token usage by 89% while maintaining 100% accuracy.
When you connect an AI agent to an MCP server with dozens of tools, every request sends the entire tool catalog to your LLM. GitHub's MCP server alone exposes 93 operations. Ask Claude to "create an issue," and it receives definitions for fork_repository, get_code_scanning_alert, list_commits—tools it will never use for that request.
This isn't just inefficient. It's expensive, slow, and can degrade response quality as models struggle with information overload.
MCP Connect Inspector UI solves this with semantic tool selection—a vector-based approach that matches your prompt to the most relevant tools before sending anything to the LLM. MCP Connect Inspector UI is a free, open-source developer GUI for working with MCP servers, and semantic tool search is built right in. Under the hood, it uses MCP-RAG, our open-source library for semantic tool discovery (read more in our deep-dive blog post). In our benchmarks, this reduced token usage by 89% and response times by 62%, while maintaining 100% accuracy.
In this guide, you'll set up semantic tool selection from scratch and see the results in real-time.
What You'll Need
- MCP Connect Inspector UI (free, open-source, running in your browser)
- An MCP server with tools to test (we'll use GitHub's server with 93 tools)
- Neo4j Aura account (free tier works) or local Neo4j instance
- OpenAI API key (for generating embeddings)
Getting the Prerequisites Running
Before diving in, you'll need the GitHub MCP server and Neo4j running locally. We have dedicated guides for both:
- How to MCP Connect to GitHub — Set up the GitHub MCP server with all 93 tools
- How to MCP Connect to Neo4j — Configure Neo4j for vector search
Following these guides will get all the dependencies running locally on your machine.
Running MCP Connect Inspector UI Locally
While you can use mcp.rconnect.tech directly, we recommend running MCP Connect Inspector UI locally to avoid CORS issues when connecting to local MCP servers:
npx @mcpconnect/cli
This starts the inspector on http://localhost:3001 and opens your browser automatically. Local servers like the GitHub MCP server connect without any CORS configuration needed.
How It Works (30-Second Overview)
Traditional tool selection sends everything:
User: "Show me the README for rocket-connect/mcp-rag"
     ↓
LLM receives: 93 tool definitions (47,000+ tokens)
     ↓
LLM picks: get_file_contents
Semantic selection is smarter:
User: "Show me the README for rocket-connect/mcp-rag"
     ↓
Vector search: Find tools semantically similar to prompt
     ↓
Top matches: get_file_contents, get_repository, list_commits
     ↓
LLM receives: 3 tool definitions (~1,000 tokens)
     ↓
LLM picks: get_file_contents
The magic happens in that vector search step. MCP Connect Inspector UI embeds your prompt and compares it against pre-computed embeddings for every tool, parameter, and return type. Neo4j handles the similarity search at scale.
But Doesn't This Add Latency?
At first glance, adding a vector search layer before each LLM call seems like it would slow things down. You're adding an extra network hop, right?
For simple one-off operations, the overhead might seem negligible either way. But consider real-time, dynamic use cases: an MCP server connected to a live phone call, a video stream, or any continuous interaction where your agent processes dozens or hundreds of requests in sequence.
In these scenarios, token reduction compounds dramatically. Every request with fewer tokens means lower costs, faster responses, and critically—reduced chance of hallucinations from information overload. When your agent is handling a 30-minute customer support call, those cumulative improvements translate directly into better experiences for your users.
The benchmark results demonstrate the impact clearly: significant token reduction with maintained accuracy across all test cases. The semantic layer pays for itself quickly, especially in high-frequency, real-time applications.
Step 1: Connect Your MCP Server
Open MCP Connect Inspector UI and connect to your MCP server. For this guide, we'll assume you're using a server with multiple tools—GitHub's MCP server is ideal for demonstrating the impact.
Once connected, you should see your tools listed in the interface. Note the count—this is what would normally be sent to your LLM on every request.
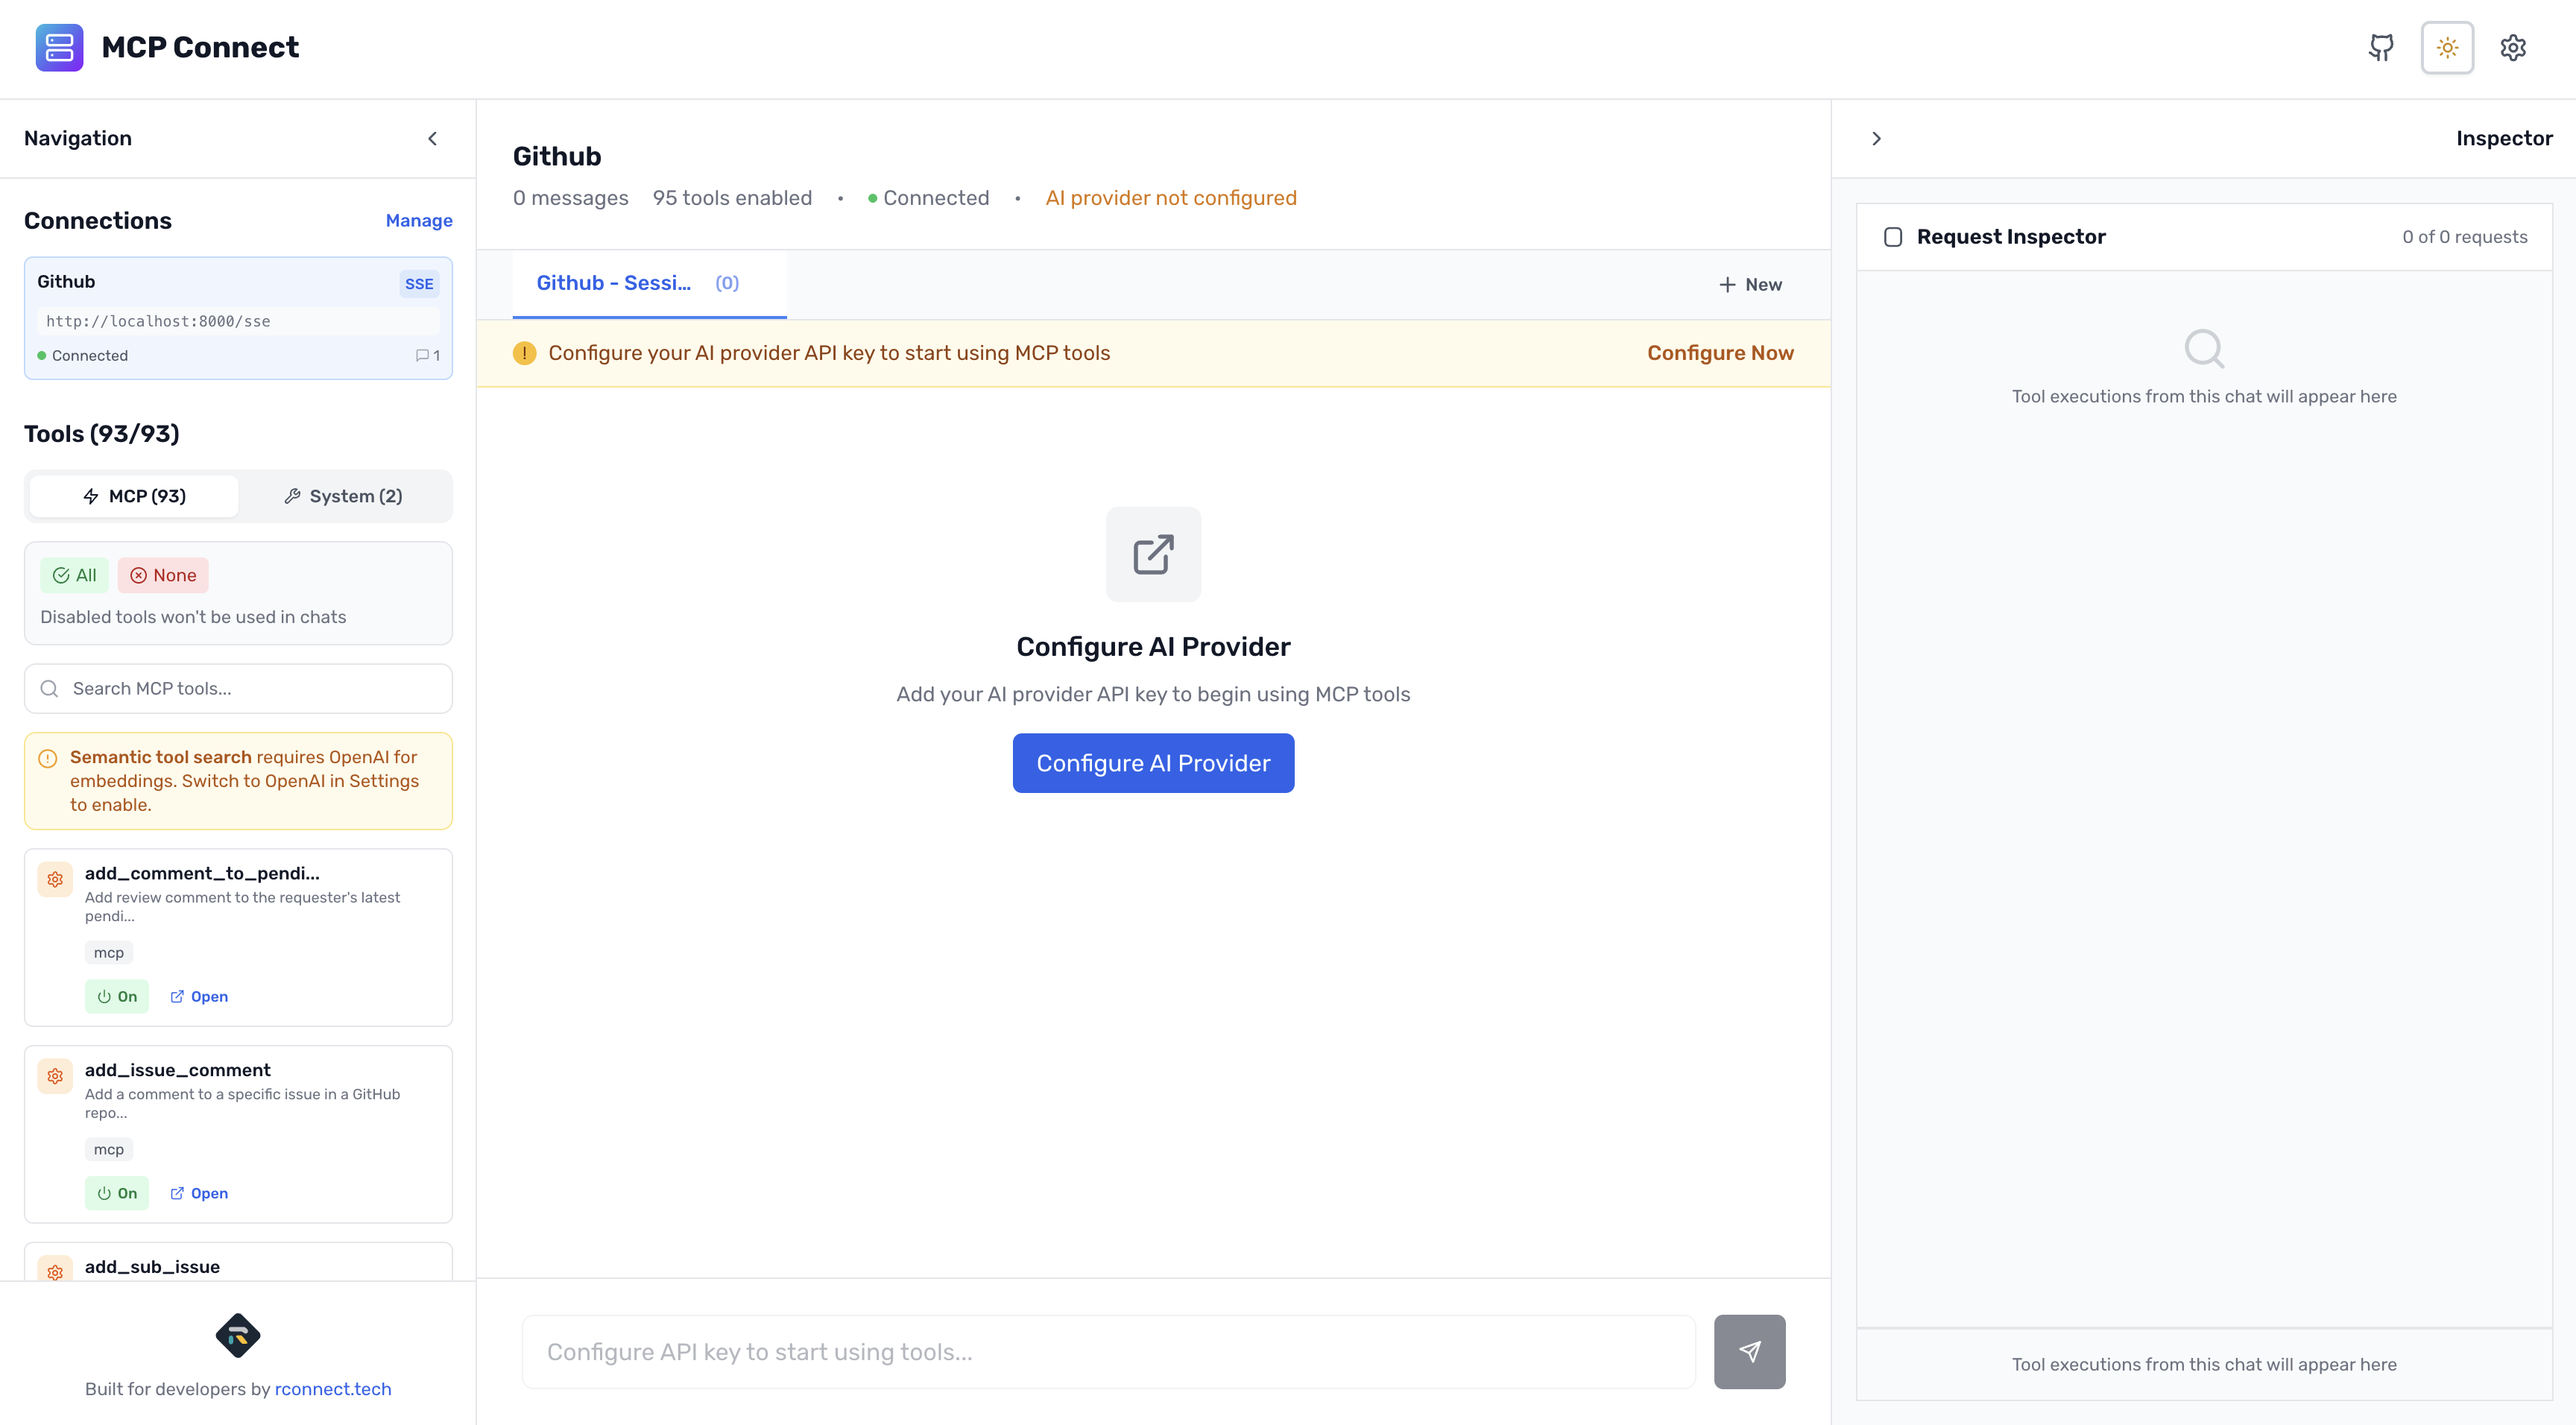
Step 2: Configure OpenAI
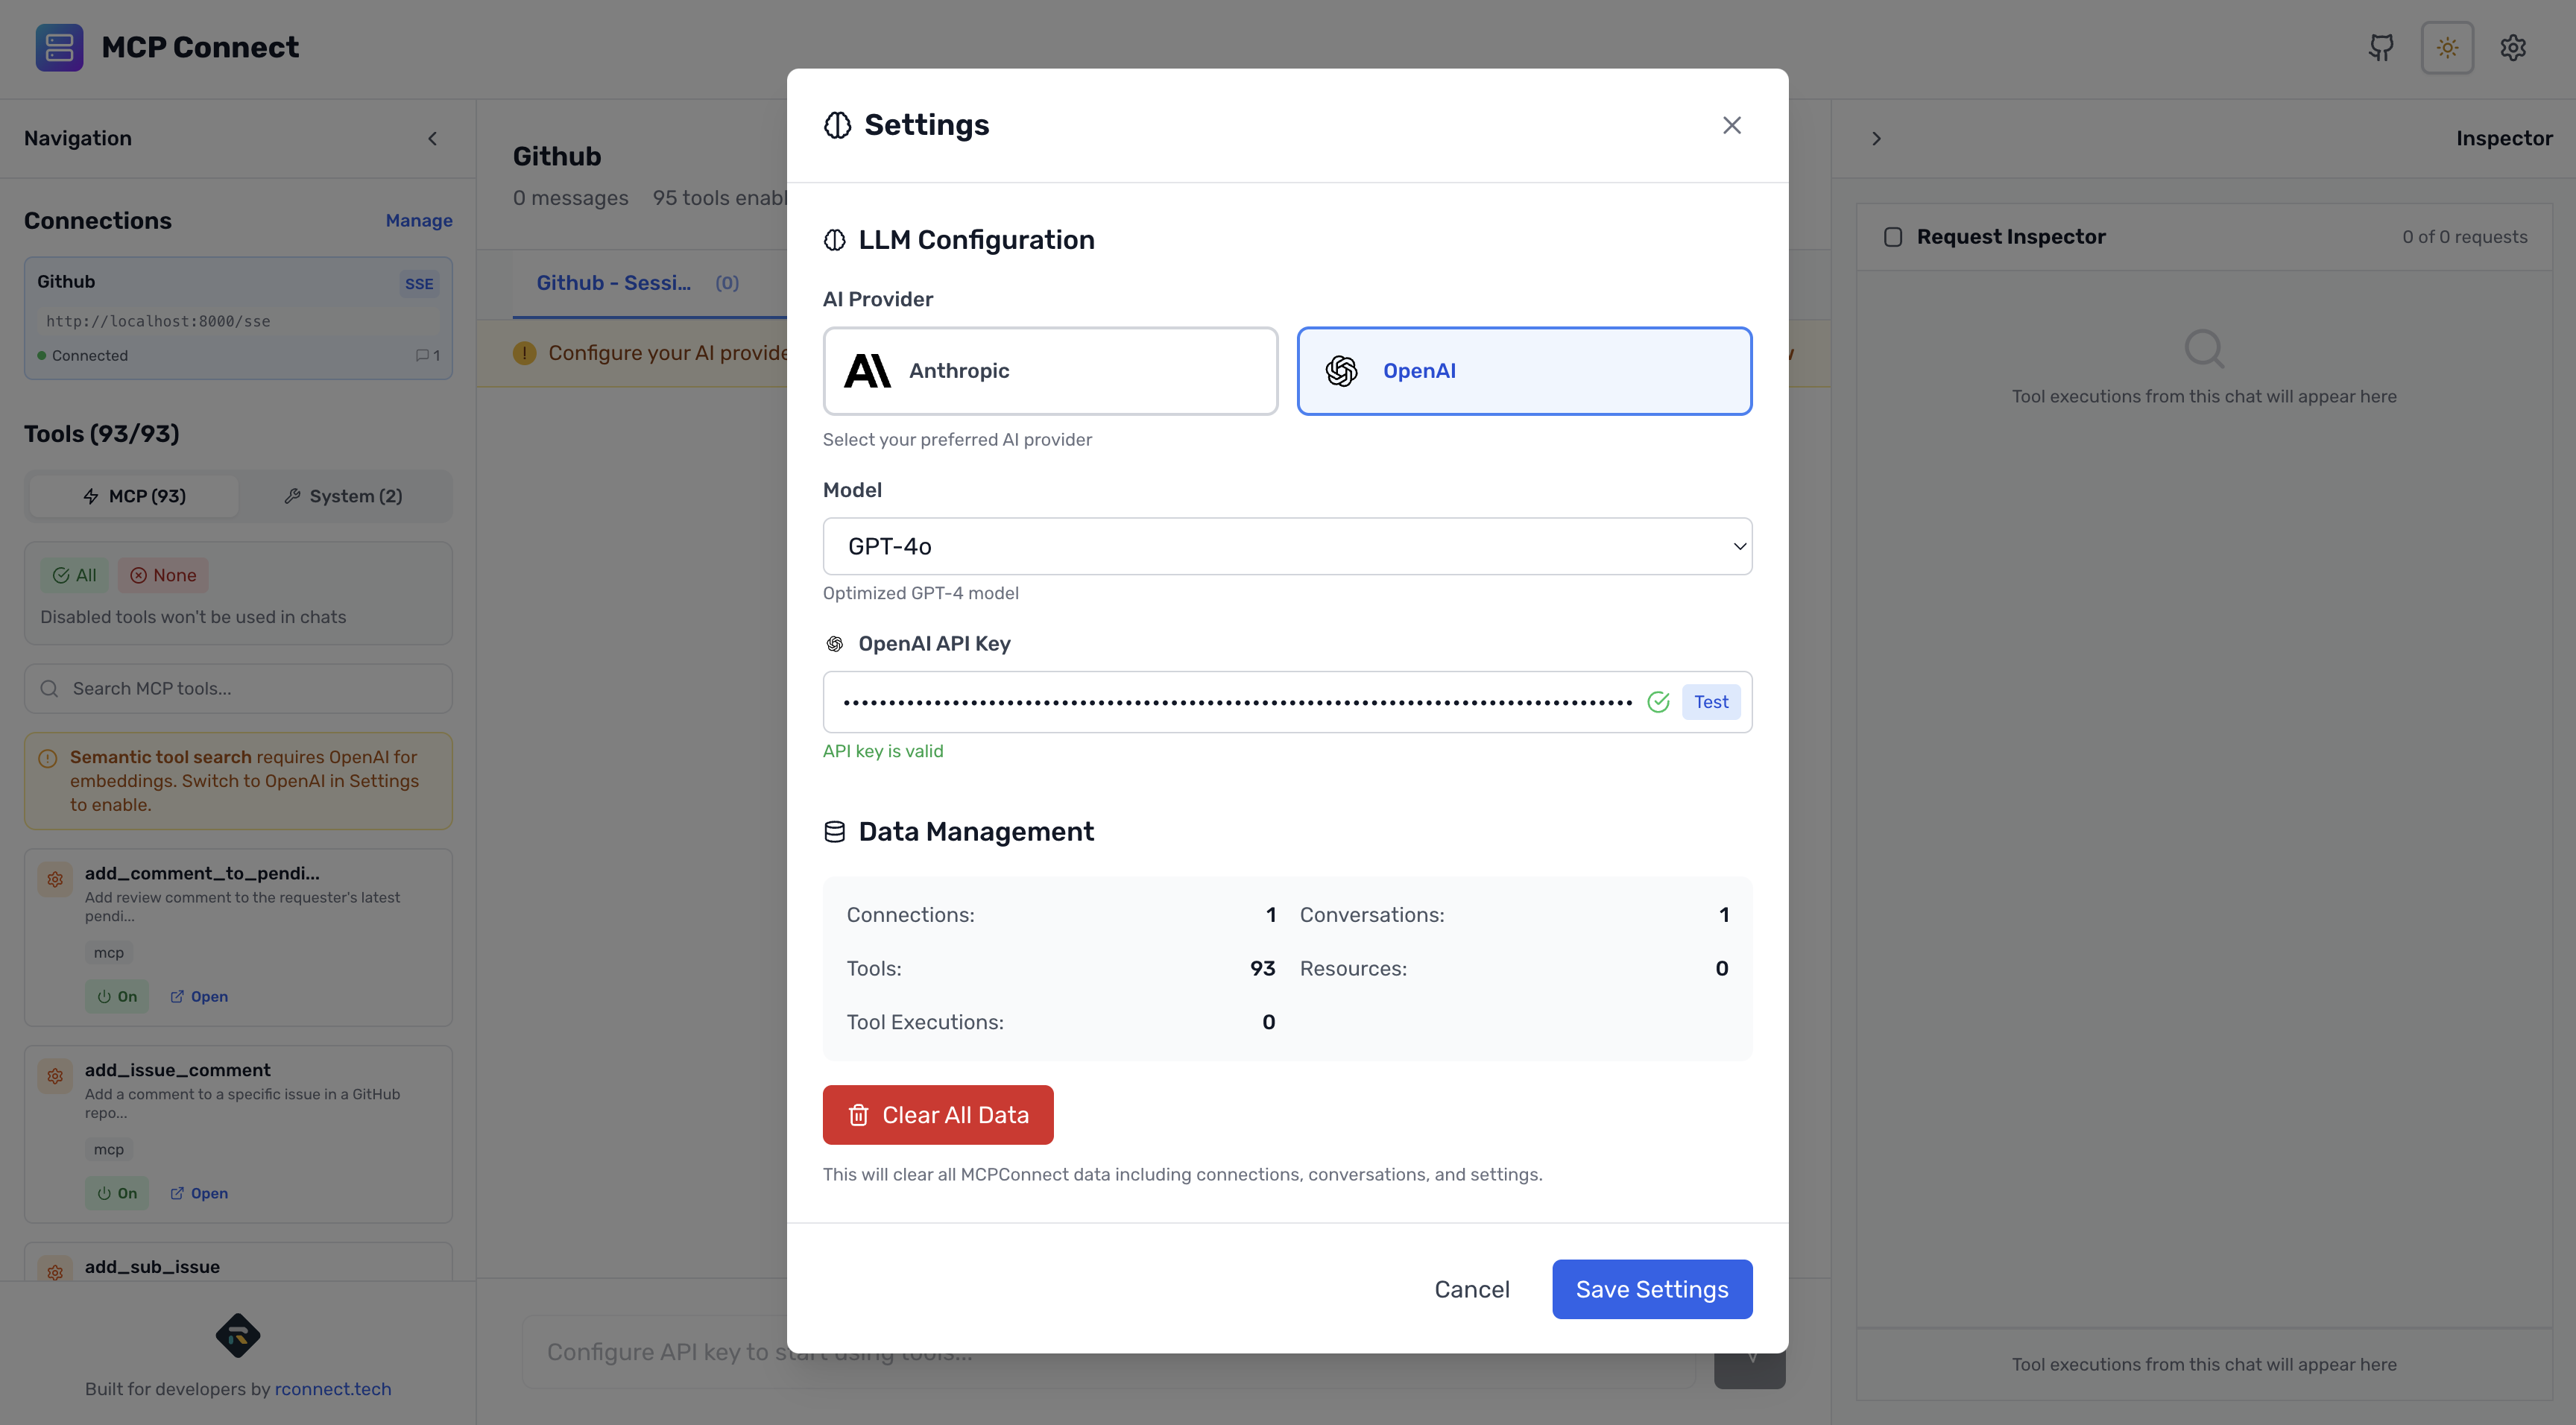
Important: Semantic tool selection requires OpenAI as your LLM provider. MCP Connect Inspector UI uses OpenAI's text-embedding-3-small model to generate the vector embeddings that power semantic search.
- In Settings, find the LLM Configuration section
- Select OpenAI as your provider
- Enter your OpenAI API key
This key is used for two purposes:
- Generating embeddings when you sync tools
- Chat completions when you interact with tools
Once OpenAI is configured, you'll see the Semantic Tool Selection panel appear in the left sidebar. This is where you'll configure Neo4j and manage your vector sync.
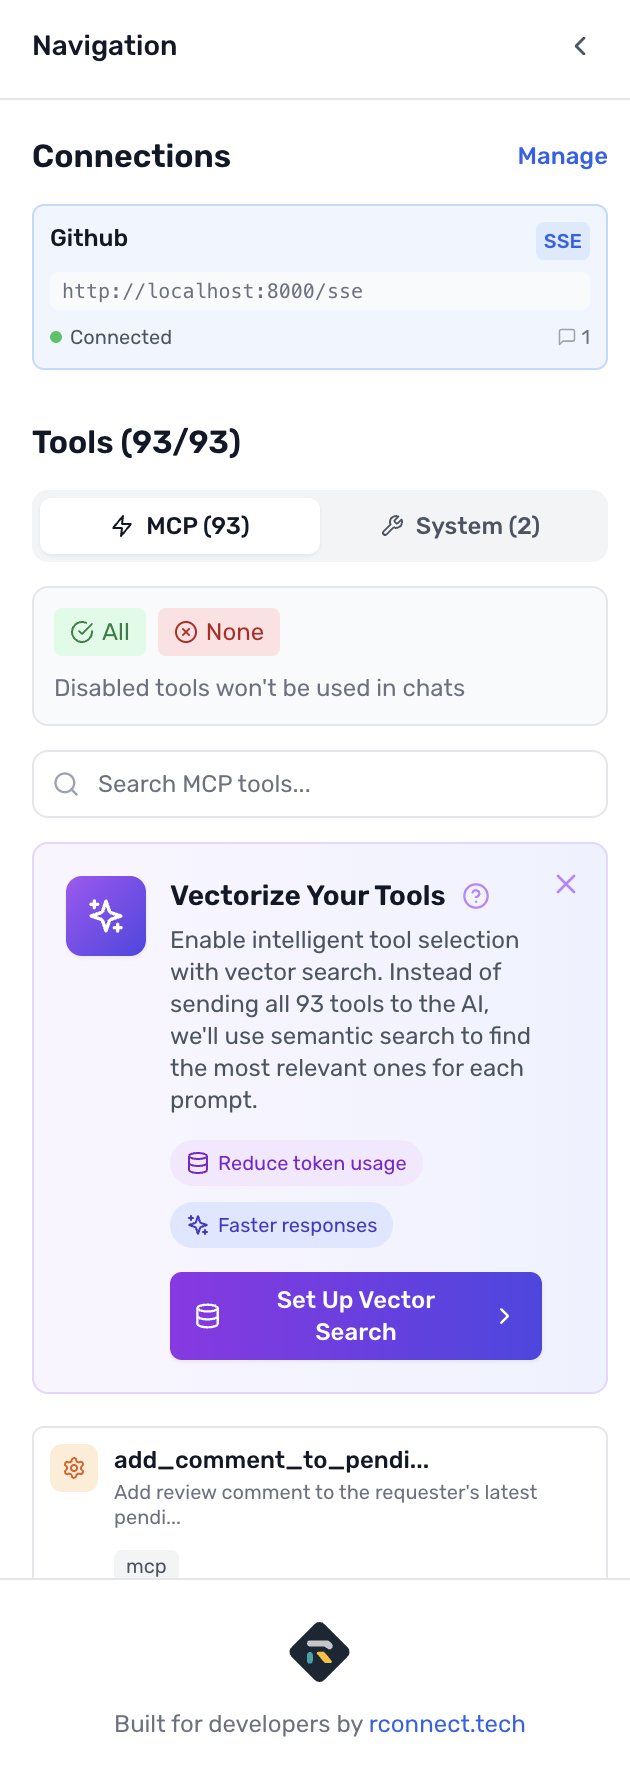
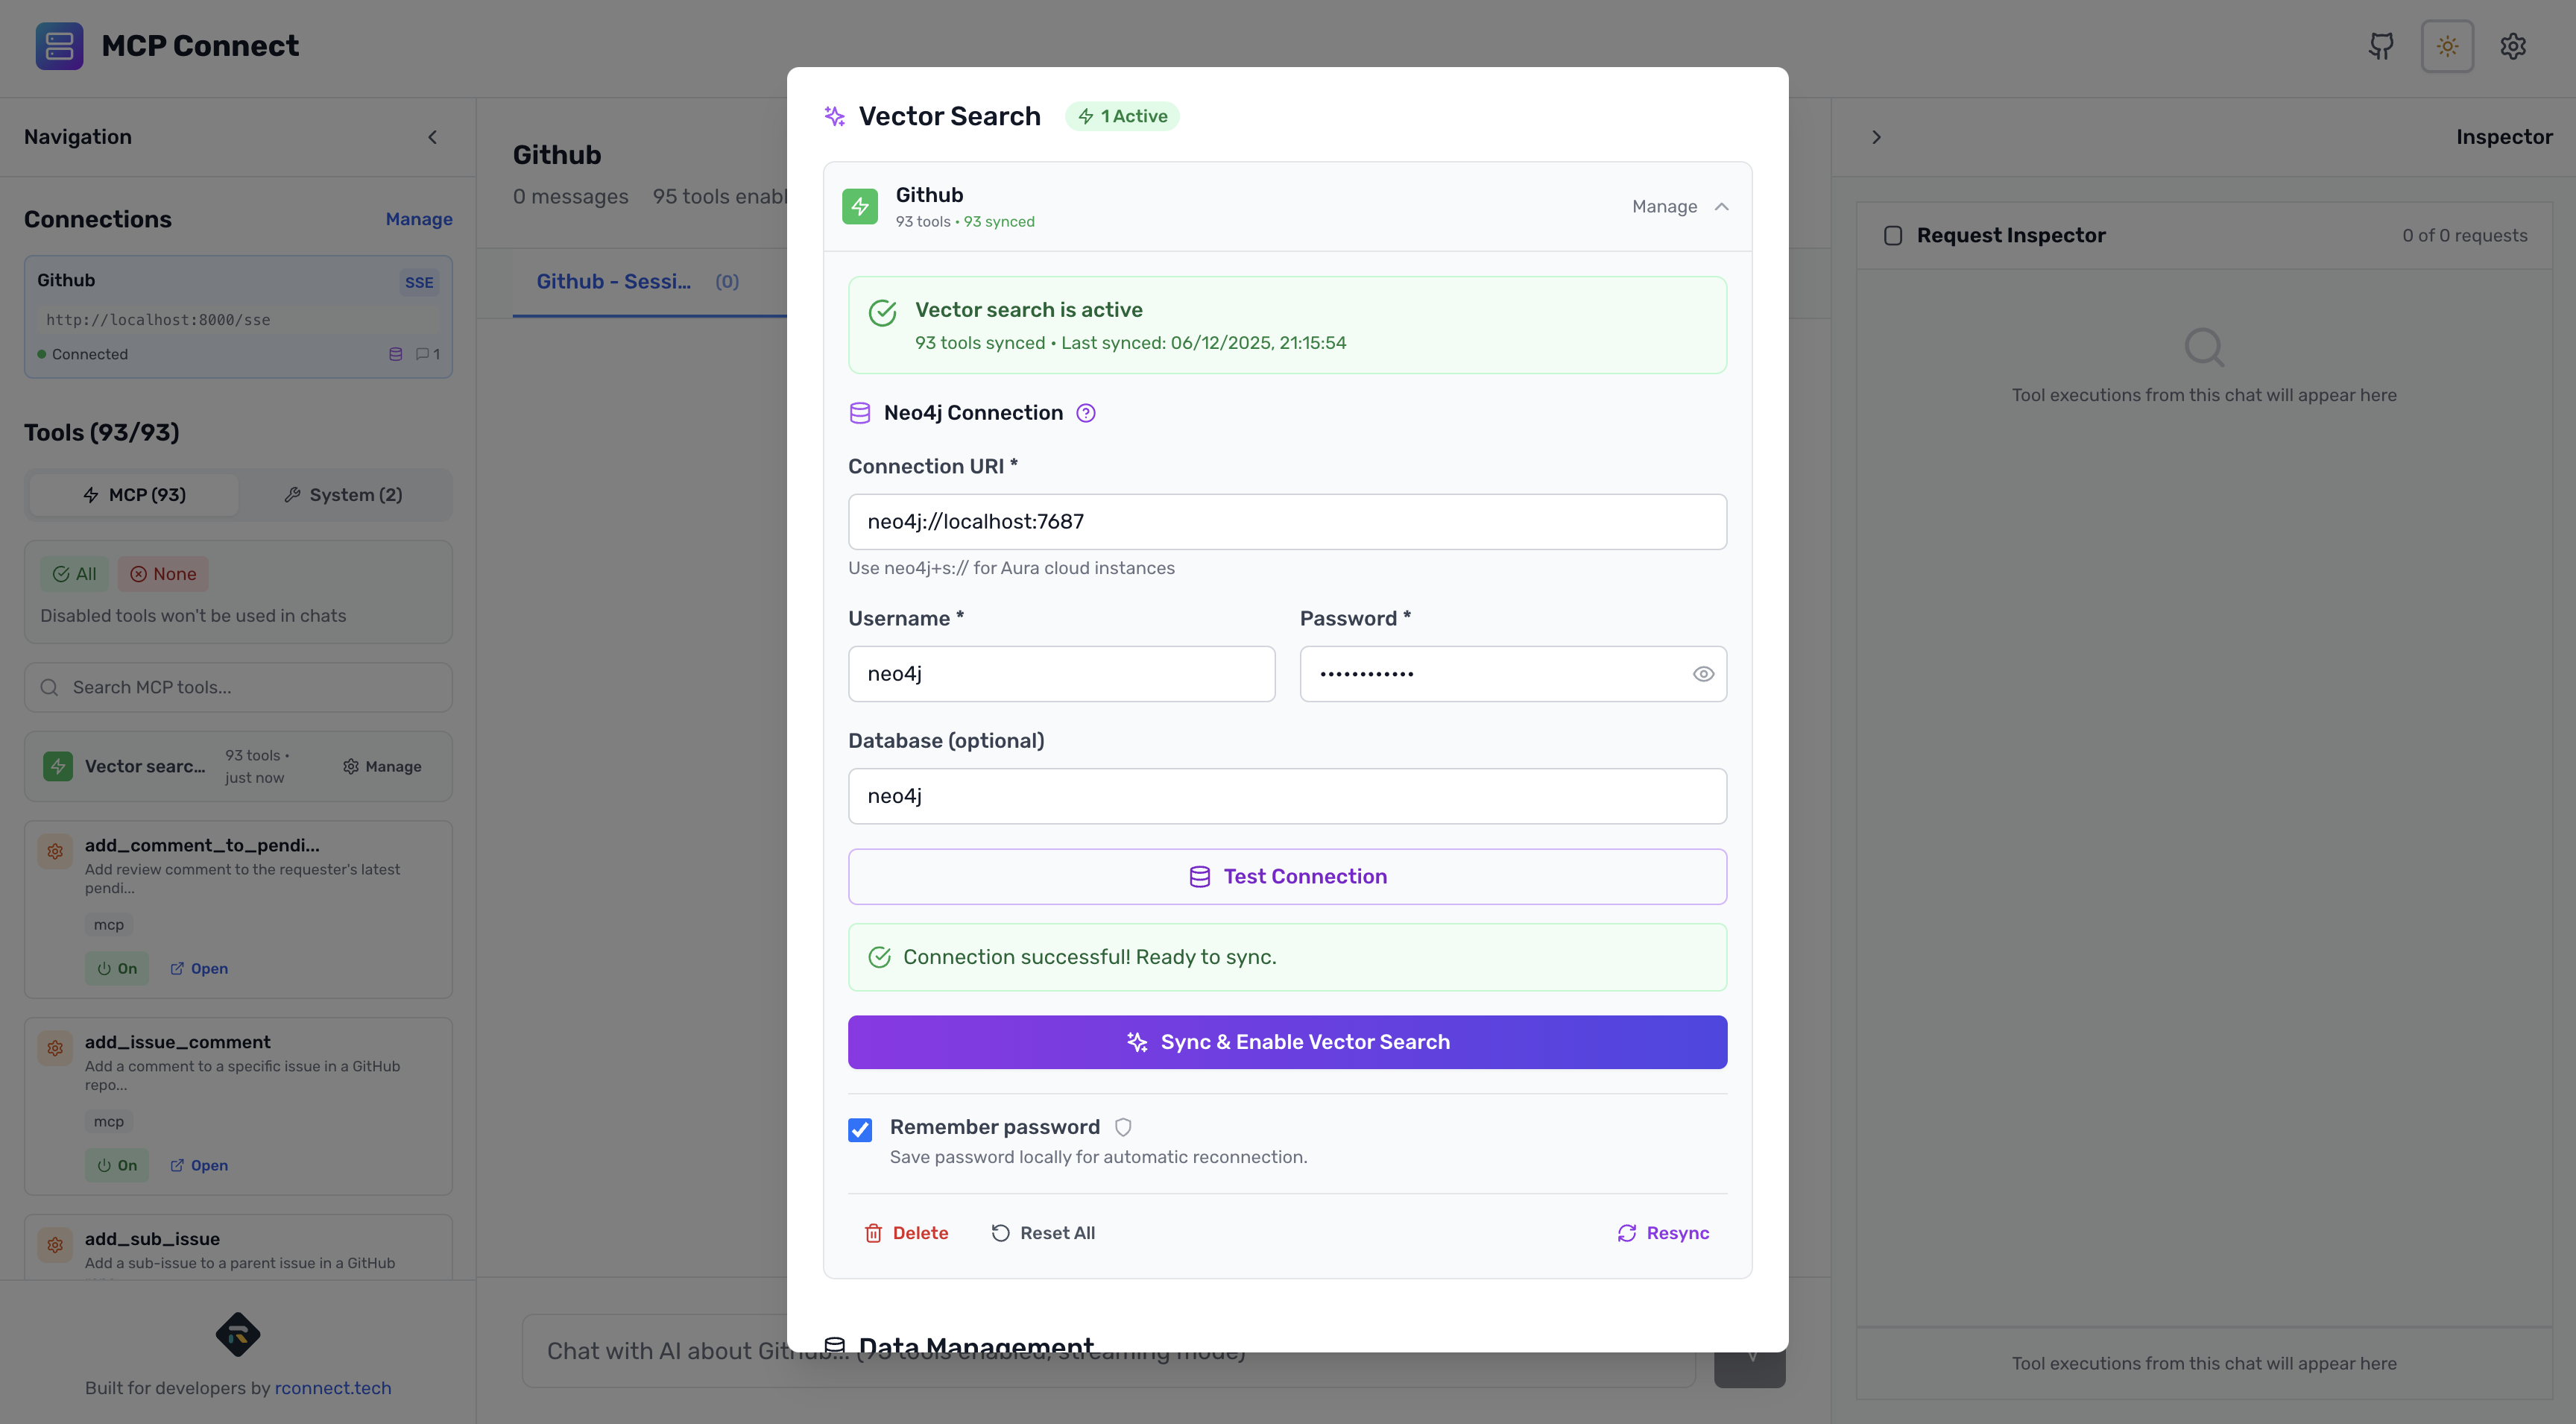
Step 3: Configure Neo4j
Click on the Semantic Tool Selection panel in the sidebar to open the settings modal.
- Enter your Neo4j connection details:
- URI: Your Neo4j connection string (e.g.,
neo4j+s://xxxxx.databases.neo4j.iofor Aura) - Username:
neo4j(default) - Password: Your Neo4j password
- Database: Leave blank for default
- URI: Your Neo4j connection string (e.g.,
- Click Test Connection to verify your credentials
- Once the connection test passes, you're ready to sync
Step 4: Vectorize Your Schema
With Neo4j connected, click the Sync button. MCP Connect Inspector UI will:
- Convert each tool to a standardized format
- Generate embeddings for tool names, descriptions, parameters, and return types
- Store everything in Neo4j with vector indexes
You'll see progress as tools are processed. For 93 GitHub tools, this typically takes 30-60 seconds on first sync.
Once complete, the status shows:
- ✅ Synced
- Tool count: Number of tools indexed
- Hash: A fingerprint of your schema (used to detect changes)
What's Being Stored?
MCP Connect Inspector UI uses a decomposed approach to indexing. Instead of one embedding per tool, it creates embeddings for:
- The tool itself (name + description)
- Each parameter (name + description)
- Return types
This granular indexing means a query like "add a comment" matches not just tools with "comment" in their name, but also tools with comment-related parameters.
In Neo4j, this creates a graph:
(ToolSet)-[:HAS_TOOL]->(Tool)
(Tool)-[:HAS_PARAM]->(Parameter)
(Tool)-[:RETURNS]->(ReturnType)
Each node has its own vector embedding.

Step 5: Test Semantic Selection
Now for the fun part. Open a chat with your connected MCP server and try a natural language query:
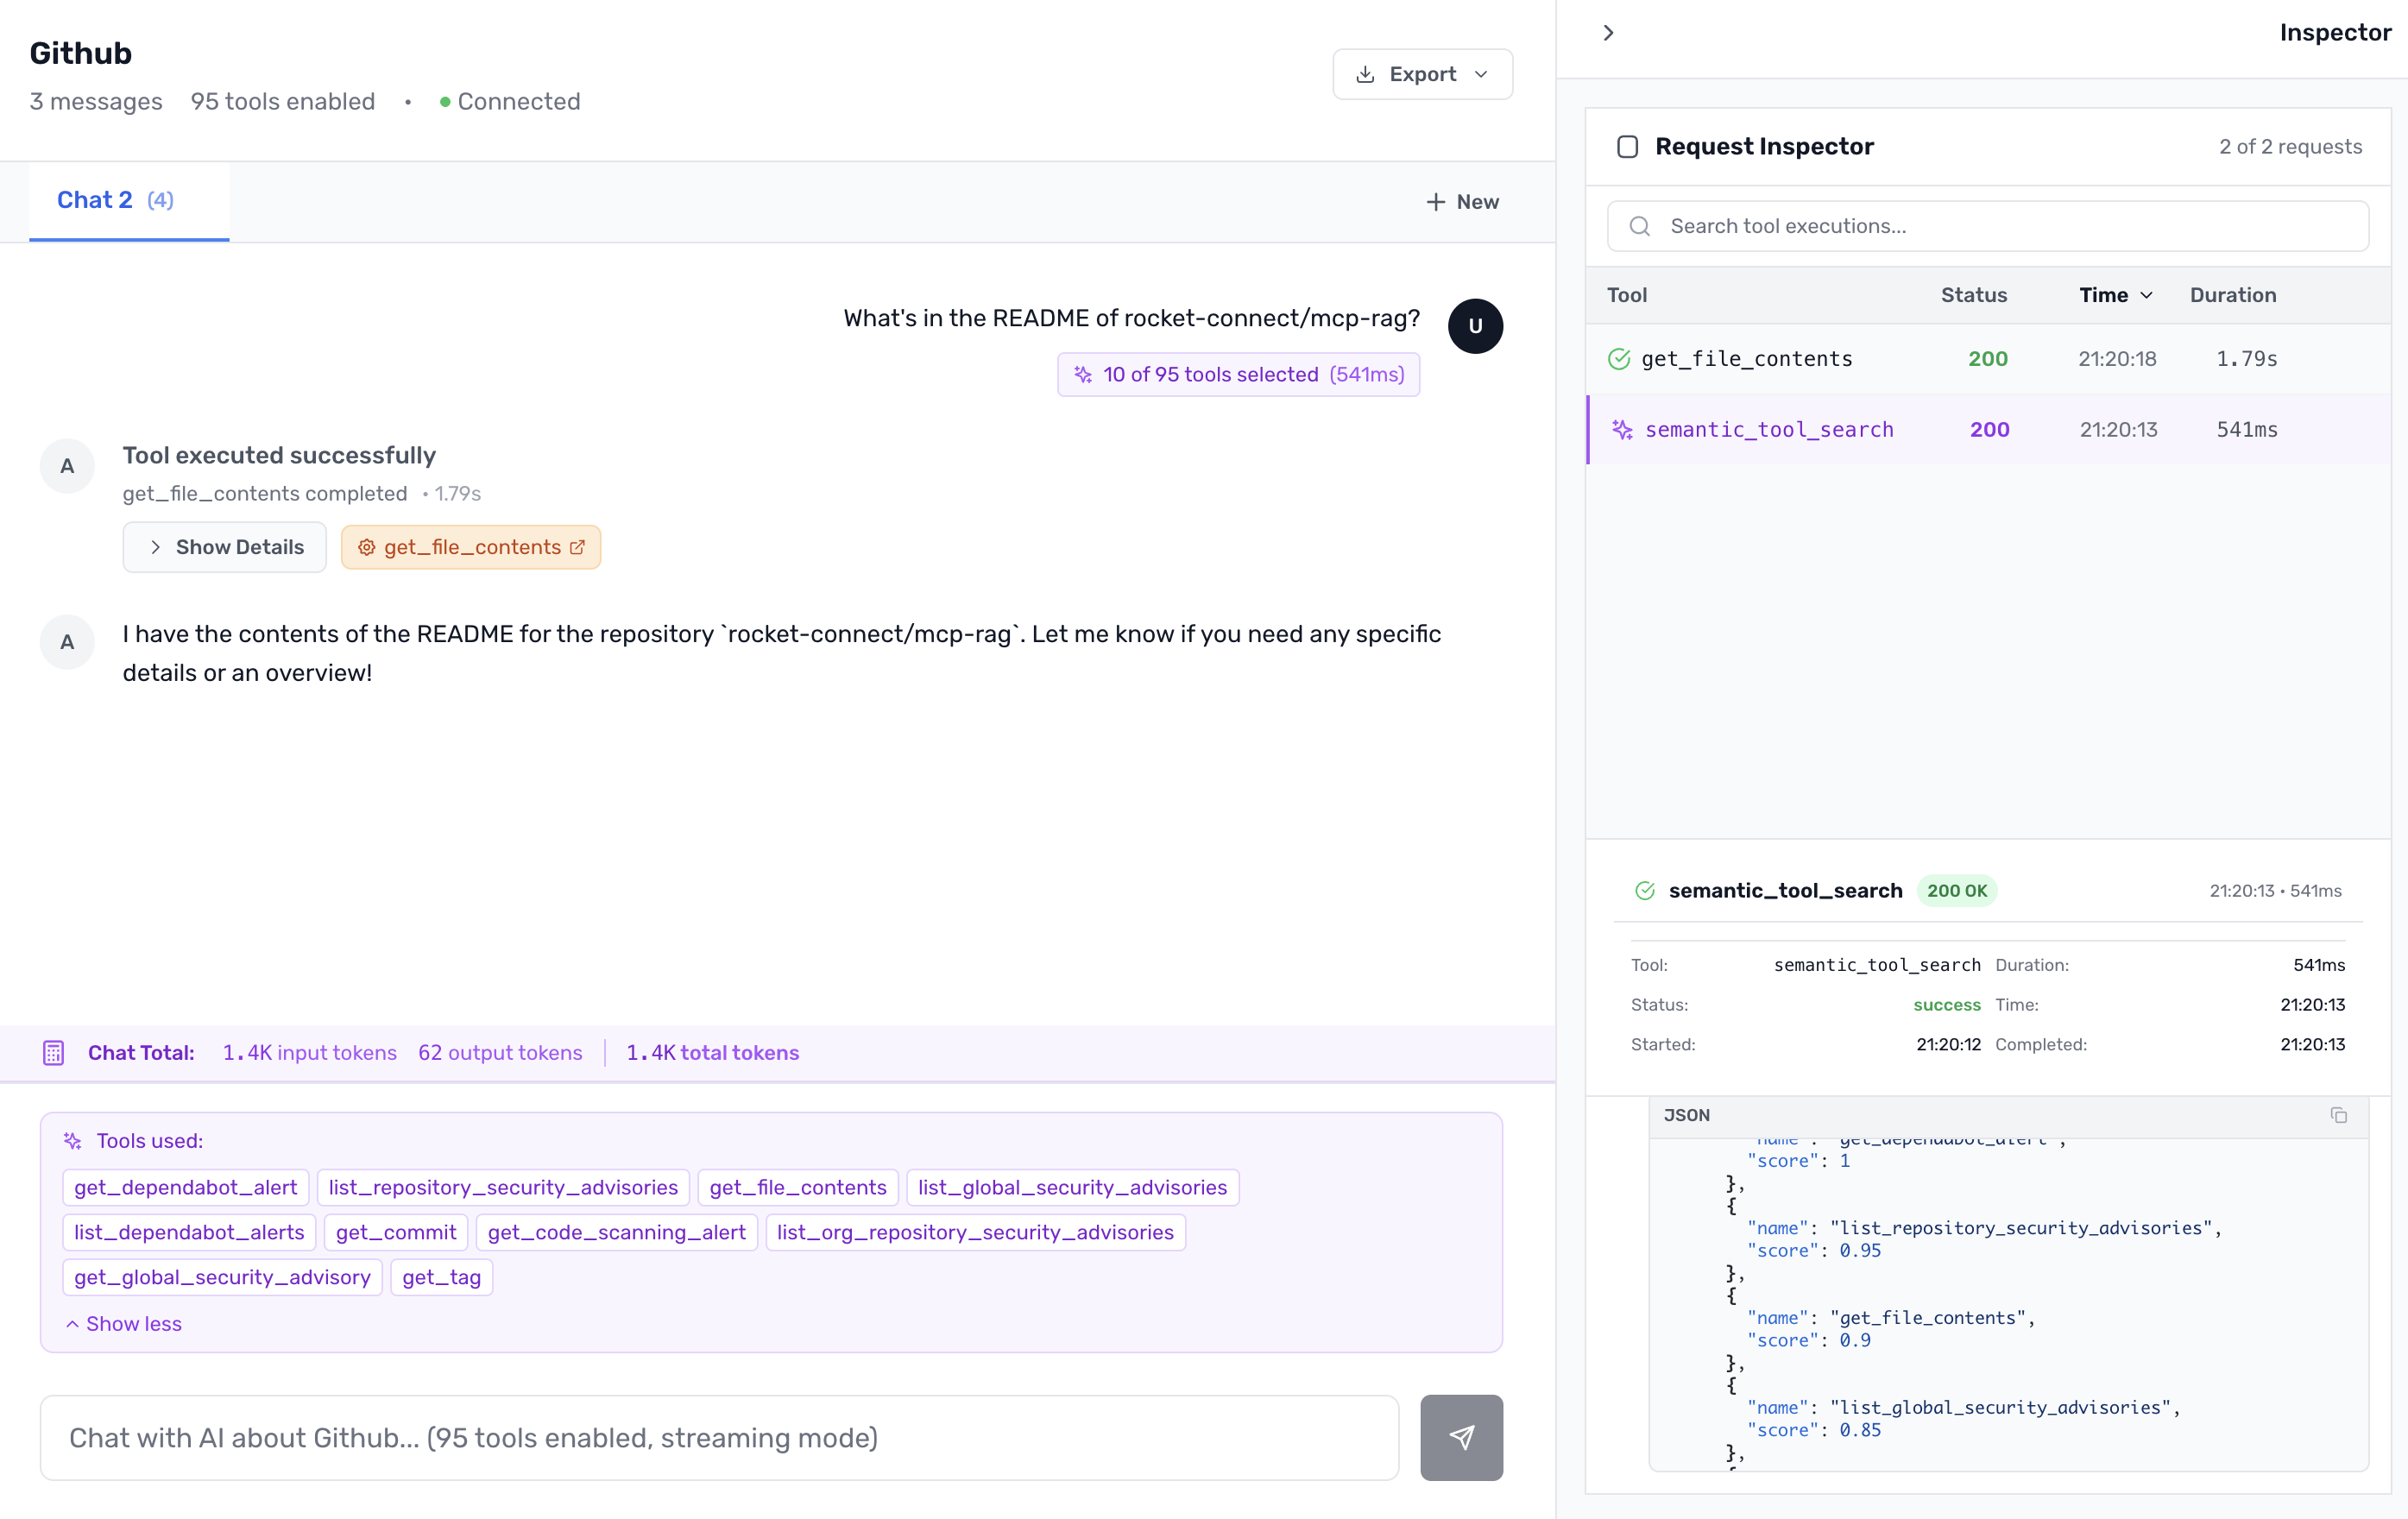
Query: "What's in the README of rocket-connect/mcp-rag?"
Watch what happens:
- Semantic search starts — MCP Connect Inspector UI embeds your prompt
- Vector search runs — Neo4j finds similar tool embeddings
- Results appear — You see which tools were selected and their relevance scores
- LLM responds — Using only the selected tools
The UI shows a Vector Search Tool Card with:
- Selected tools ranked by relevance
- Relevance percentages (e.g.,
get_file_contents: 94%) - Search duration
- Context reduction (e.g., "Reduced context by 89%")
Try Different Queries
| Query | Expected Top Tools |
|---|---|
| "Get pull request #1 from rocket-connect/mcp-rag" | get_pull_request |
| "List all open issues in rocket-connect/mcpconnect" | list_issues, search_issues |
| "Show me the recent commits on mcp-rag" | list_commits |
| "What's in the README?" | get_file_contents |
| "Get the repo details for rocket-connect/mcp-rag" | get_repository |
Step 6: Compare Before and After
To really appreciate the improvement, compare metrics with and without semantic selection.
Without Semantic Selection (Baseline)
| Metric | Value |
|---|---|
| Tools sent to LLM | 93 |
| Prompt tokens | ~47,000 |
| Response time | ~4,500ms |
With Semantic Selection
| Metric | Value |
|---|---|
| Tools sent to LLM | 5-10 |
| Prompt tokens | ~1,000-2,000 |
| Response time | ~1,700ms |
Results:
- 89% reduction in token usage
- 62% faster responses
- 100% accuracy maintained
These aren't theoretical—they're from our benchmark suite running real queries against the full GitHub toolset. View the complete benchmark results on GitHub.
Development vs Production
MCP Connect Inspector UI is a free, open-source local development tool. It's designed to help you experiment with MCP servers, debug tool interactions, and test semantic selection—all from your browser during development.
When you're juggling multiple MCP servers with dozens of tools each, semantic selection in MCP Connect Inspector UI helps you:
- Validate that your prompts match the right tools
- Fine-tune max tool counts and relevance thresholds
- Debug why certain tools aren't being selected
- Measure token savings before committing to production
Taking It to Production
For production deployments, use MCP-RAG directly. It's the same open-source library that powers MCP Connect Inspector UI's semantic selection, but designed to wrap your AI SDK in your own applications.
import { createMCPRag } from '@mcp-rag/client';
import { openai } from '@ai-sdk/openai';

const rag = createMCPRag({
  model: openai('gpt-4'),
  neo4j: driver,
  tools: yourMCPTools,
});

// Sync once at startup
await rag.sync();

// Use exactly like the AI SDK, but with semantic selection
const result = await rag.generateText({
  prompt: userQuery,
  maxActiveTools: 10,
});
MCP-RAG is a drop-in wrapper around the AI SDK. Your existing code stays the same—you just get automatic semantic tool filtering on every request.
Conclusion
If you're building with MCP and your agents have access to more than a handful of tools, semantic selection isn't optional—it's essential. The token savings alone justify the setup, but the real win is faster, more focused responses.
Use MCP Connect Inspector UI during development to experiment and validate. When you're ready for production, wrap your AI SDK with MCP-RAG and deploy with confidence.
Try it now: MCP Connect Inspector UI
Questions? Find us on Twitter @dan_starns or open an issue on GitHub.
Resources
- MCP Connect Inspector UI — Try semantic tool selection in your browser
- MCP Connect GitHub — Source code for MCP Connect Inspector UI
- MCP-RAG Repository — Open source library for production deployments
- Benchmark Results — View the raw performance data
- Neo4j Aura — Free cloud vector database
- Semantic Tool Discovery Blog — Deep-dive into the MCP-RAG architecture
Dan Starns is the Founder & CTO of Rocket Connect, former core contributor to Neo4j, and builder of developer tools that make AI agents more efficient. Currently based in Southeast Asia, organizing developer events and pushing the boundaries of MCP tooling.